- SystemVerilog 32.3%
- Assembly 26.3%
- Tcl 19.4%
- Python 6.5%
- Stata 5.9%
- Other 9.5%
| Filename | Latest commit message | Latest commit date |
|---|---|---|
|
|
||
| .github | ||
| addins | ||
| benchmarks | ||
| bin | ||
| config | ||
| docs | ||
| examples | ||
| fpga | ||
| linux | ||
| sim | ||
| src | ||
| studies | ||
| synthDC | ||
| testbench | ||
| tests | ||
| .editorconfig | ||
| .gitignore | ||
| .gitmodules | ||
| .pre-commit-config.yaml | ||
| .ruff.toml | ||
| CLAUDE.md | ||
| CONTRIBUTING.md | ||
| errata.md | ||
| LICENSE | ||
| Makefile | ||
| pyproject.toml | ||
| README.md | ||
| setup.csh | ||
| setup.sh | ||
| site-setup.csh | ||
| site-setup.sh | ||
| uv.lock | ||
| wallyriscvTopAll.png | ||


core-v-wally
Wally is a 5-stage pipelined processor configurable to support up through the RVA22 profile, including virtual memory, PMP, and the various privileged modes and CSRs. The rv64gc configuration supports:
- RV64IMAFDCB with M, S, and U modes
- Zicsr, Zifencei, Zicntr, Zihpm, Zicond, and Zicclsm
- Zbc
- Zkn scalar crypto (Zbkb, Zbkc, Zbkx, Zknd, Zkne, and Zknh)
- Zcb
- Zfh and Zfa
- Zicbom, Zicboz, and Zicbop
- Sstc
- Sv39, Sv48, and Sv57 virtual memory with Svpbmt, Svnapot, Svinval, and Svadu
- 16 PMP entries
Other configurations range down to a minimal RV32E core, and derivative configurations add the Q extension. Wally provides optional caches, branch prediction, and standard RISC-V peripherals (CLINT, PLIC, UART, GPIO). Wally is written in SystemVerilog. It passes the RISC-V Arch Tests and boots Linux on an FPGA. Wally is part of the OpenHW Foundation family of robust open RISC-V cores.
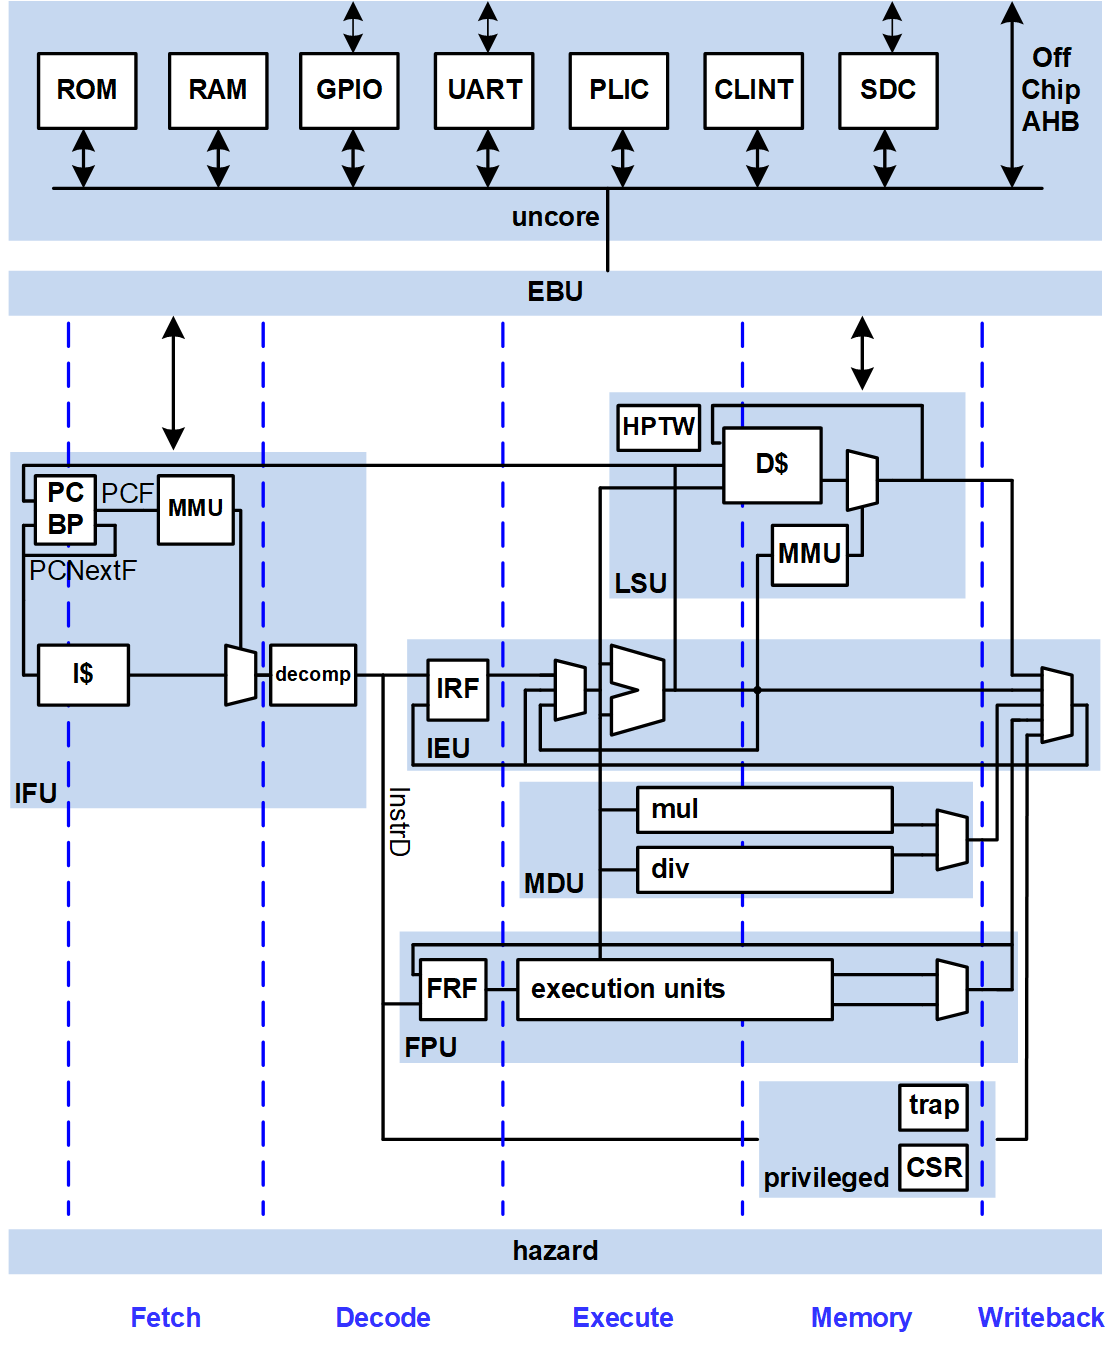
Wally is described in a textbook, RISC-V System-on-Chip Design, by Harris, Stine, Thompson, and Harris. Users should follow the setup instructions below.
Configurations
Wally default configurations are listed below. Synthesis results are from TSMC 28HPC+ TT conditions (0.9 V, 25 °C), Design Compiler Y-2026.03-SP3 physical (topographical) synthesis, with timing that includes its estimated wire delays, before place and route. The hierarchy is ungrouped automatically, and the clock frequency counts paths into the register files, which are written on the falling edge, as half-cycle paths. Embench results are without F and D.
| rv32e | rv32i | rv32imc | rv32imcb | rv32gc | rv64i | rv64gc | |
|---|---|---|---|---|---|---|---|
| Features | Tiny Embedded | RVI20U32 | Microcontroller | Microcontroller with bit manipulation | Like rv64gc | RVI20U64 | RVA22S64 |
| Privilege Modes | M | M | M, U | M, U | M, S, U | M | M, S, U |
| Extensions | E | I | IMC, Zicsr, Zicntr, Zihpm | IMCB, Zbc, Zicsr, Zicntr, Zihpm | IMAFDCB, Zbc, Zbkb, Zbkc, Zbkx, Zkn, Zkt, Zfh, Zfa, Zcb, Zicond, Zicbom, Zicboz, Zicbop, Zifencei, Zicntr, Zihpm, Sv32, Svadu, Svinval, Sstc | I | IMAFDCB, Zbc, Zbkb, Zbkc, Zbkx, Zkn, Zkt, Zfh, Zfa, Zcb, Zicond, Zicbom, Zicboz, Zicbop, Zifencei, Zicntr, Zihpm, Sv39, Sv48, Sv57, Svadu, Svinval, Svnapot, Svpbmt, Sstc |
| Memory | Bus | IROM, DTIM | IROM, DTIM | IROM, DTIM | 16 KB I$, 16 KB D$ | IROM, DTIM | 16 KB I$, 16 KB D$ |
| Branch Predictor | None | None | Static (backward taken) | Static (backward taken) | 1K gshare, 1K BTB, 16 RAS | None | 1K gshare, 1K BTB, 16 RAS |
| Peripherals | No | No | CLINT, PLIC, UART, GPIO, SPI, PWM | CLINT, PLIC, UART, GPIO, SPI, PWM | CLINT, PLIC, UART, GPIO, SPI, PWM | No | CLINT, PLIC, UART, GPIO, SPI, PWM |
| External bus (AHB) | Yes | No | Yes | Yes | Yes | No | Yes |
| CoreMark/MHz | 0.35 | 1.04 | 3.54 | 4.06 | 4.33 | 0.91 | 4.20 |
| Embench Speed | 0.20 | 0.63 | 1.58 | 1.65 | 1.70 | 0.70 | 2.03 |
| Clock Frequency (MHz) | 2800 | 2780 | 1880 | 1890 | 920 | 2540 | 770 |
| Total Area (mm^2) | 0.0058 | 0.0065 | 0.020 | 0.021 | 0.43 | 0.016 | 0.48 |
| Logic Area (mm^2) | 0.0058 | 0.0065 | 0.020 | 0.021 | 0.11 | 0.016 | 0.17 |
| Flip-Flops | 573 + 495 latches | 573 + 1,023 latches | 1,792 + 1,023 latches | 1,801 + 1,023 latches | 16,496 | 3,026 | 24,416 |
| Gates | 3,650 | 4,495 | 14,583 | 16,122 | 89,945 | 10,309 | 139,072 |
| RAM Bits | 0 | 0 | 0 | 0 | 312,320 | 0 | 356,352 |
CoreMark and Embench (speed-optimized, scored per MHz) are compiled for each configuration's ISA and simulated with Verilator. With F and D, the compiler optimizes away much of the timed work in the Embench nbody, st, and minver benchmarks, so Embench is compiled without F and D for every configuration, and its floating-point benchmarks use software floating point rather than the FPU. rv32e, rv32i, and rv64i add performance counters to time the benchmarks. Synthesis is of wallypipelinedcore, with rv32i, rv32imc, rv32imcb, and rv64i using the AHB bus in place of the IROM and DTIM. The clock frequency is the best of three synthesis targets, and the area is from that run. Flip-flops and gates are standard cells; gates exclude buffers and inverters. rv32e, rv32i, rv32imc, and rv32imcb build the integer register file from latches (LATCH_BASED_REGISTERFILE), counted separately, including a clock-gate latch for each register. RAM bits are the SRAM bits used for I$ and D$ data and tags, BTB, and PHT; the SRAM macros take 0.31 mm^2 in rv32gc and rv64gc.
See also comparison to other cores.
Verification
Wally is presently at Technology Readiness Level 4, passing the RISC-V architectural certification tests and custom tests, and booting Linux in simulation and on an FPGA. The rv32imc, rv32gc, and rv64gc configurations achieve 100% code and functional coverage. See the Test Plan for details.
New User Setup
New users may wish to do the following setup to access the server via a GUI and use a text editor.
- Git started with Git configuration and authentication: C.1 (replace with your name and email)
$ git config --global user.name "Ben Bitdiddle" $ git config --global user.email "ben_bitdiddle@wally.edu" $ git config --global pull.rebase false - Optional: Download and install x2go - B.1.1
- Optional: Download and install VSCode - B.4.2
- Optional: Make sure you can log into your server via x2go and via a terminal
- Terminal on Mac, cmd on Windows, xterm on Linux
- See B.1 about ssh -Y login from a terminal
Then fork and clone the repo, source setup, make the tests and run regression
- If you don't already have a Github account, create one
- In a web browser, visit https://github.com/openhwfoundation/cvw
- In the upper right part of the screen, click on Fork
- Create a fork, choosing the owner as your github account and the repository as cvw.
- On the Linux computer where you will be working, log in.
- Clone your fork of the repo. Change
<yourgithubid>to your github id.
$ git clone --recurse-submodules https://github.com/<yourgithubid>/cvw
$ cd cvw
$ git remote add upstream https://github.com/openhwfoundation/cvw
Note
If you are installing on a new system without any tools installed, please jump to the next section, Toolchain Installation, then come back here.
- Run the setup script to update your
PATHand activate the python virtual environment.
$ source ./setup.sh
- Add the following lines to your
.bashrcor.bash_profileto run the setup script each time you log in.
if [ -f ~/cvw/setup.sh ]; then
  source ~/cvw/setup.sh
fi
- Try compiling the HelloWally program and simulating it on the SystemVerilog with Verilator and on the Spike simulator.
$ cd examples/C/hello
$ make
$ wsim --sim verilator rv64gc --elf hello
Hello Wally!
0 1 2 3 4 5 6 7 8 9
$ spike hello
Hello Wally!
0 1 2 3 4 5 6 7 8 9
- Build the tests from the cvw directory and run a regression simulation to prove everything is installed. Building tests may take a while.
$ cd ~/cvw && make --jobs
$ regression-wally
Toolchain Installation and Configuration
This section describes the open source toolchain installation.
Compatibility
The current version of the toolchain has been tested on Ubuntu (versions 20.04 LTS, 22.04 LTS, 24.04 LTS, and 26.04 LTS), Debian (versions 12 and 13), Red Hat/Rocky/AlmaLinux (versions 8, 9, and 10), SUSE versions 15.6 and 16.0 and Fedora (version 44). Only the latest minor release of each major version is tested.
Warning
- Ubuntu 22.04 LTS is incompatible with Synopsys Design Compiler.
- Whisper is not installed on Ubuntu 20.04 LTS due to issues compiling the boost libraries.
Overview
The toolchain installation script installs the following tools:
- RISC-V GNU Toolchain: GCC and accompanying compiler tools
- QEMU: emulator
- Spike: functional RISC-V model
- Whisper: RISC-V instruction set simulator (ISS)
- Verilator: open-source Verilog simulator
- RISC-V Sail Model: golden reference model for RISC-V
- OSU Skywater 130 cell library: standard cell library
- uv: Python package manager and virtual environment tool
- mise: development environment setup tool for managing tool versions and environment variables
Additionally, Buildroot Linux is built for Wally and linux test-vectors are generated for simulation. See the Linux README for more details. This can be skipped using the --no-buildroot flag.
Installation
The tools can be installed by running
$ $WALLY/bin/wally-tool-chain-install.sh
If this script is run as root or using sudo, it will also install all of the prerequisite packages using the system package manager. The default installation directory when run in this manner is /opt/riscv.
If a user-level installation is desired, the script can instead be run by any user without sudo and the installation directory will be ~/riscv. In this case, the prerequisite packages must first be installed by running
$ sudo $WALLY/bin/wally-package-install.sh
In either case, the installation directory can be overridden by passing the desired directory as an argument to the installation script. For example,
$ sudo $WALLY/bin/wally-tool-chain-install.sh /home/riscv
See wally-tool-chain-install.sh and the scripts in the $WALLY/bin/installation directory for a detailed description of each component, or to issue the commands one at a time to install on the command line.
Note
The complete installation process requires ~55 GB of free space. If the
--cleanflag is passed to the installation script then the final consumed space is only ~26 GB. The--cleanflag removes source files and build directories.
Configuration
$WALLY/setup.sh sources $RISCV/site-setup.sh. If the toolchain was installed in either of the default locations (/opt/riscv or ~/riscv), $RISCV will automatically be set to the correct path when setup.sh is run. If a custom installation directory was used, then $WALLY/setup.sh must be modified to set the correct path.
$RISCV/site-setup.sh allows for customization of the site specific information such as commercial licenses and PATH variables. It is automatically copied into your $RISCV folder when the installation script is run.
Change the following lines to point to the path and license server for your Siemens Questa and Synopsys Design Compiler and VCS installations and license servers. If you only have Questa or VCS, you can still simulate but cannot run logic synthesis. If Questa, VSC, or Design Compiler are already setup on this system then don't set these variables.
export MGLS_LICENSE_FILE=..         # Change this to your Siemens license server
export SNPSLMD_LICENSE_FILE=..      # Change this to your Synopsys license server
export QUESTA_HOME=..               # Change this for your path to Questa
export DC_HOME=..                   # Change this for your path to Synopsys Design Compiler
export VCS_HOME=..                  # Change this for your path to Synopsys VCS
Installing EDA Tools
Electronic Design Automation (EDA) tools are vital to implementations of System on Chip architectures as well as validating different designs. Open-source and commercial tools exist for multiple strategies and although the one can spend a lifetime using combinations of different tools, only a small subset of tools is utilized for this text. The tools are chosen because of their ease in access as well as their repeatability for accomplishing many of the tasks utilized to design Wally. It is anticipated that additional tools may be documented later after this is text is published to improve use and access.
Verilator is an open-source Verilog simulator. It is fast and free. Run Wally on the riscv-arch-test suite using Verilator with:
regression-wally
Running code coverage simulations or lock-step presently requires commercial tools; functional coverage also runs on Verilator. Siemens Questa is the primary tool utilized for simulating and validating Wally. Synopsys VCS also can run regression-wally, lock-step simulation, and code and functional coverage. For logic synthesis, you will need Synopsys Design Compiler. Questa and Design Compiler are commercial tools that require an educational or commercial license.
Note: Some EDA tools utilize LM_LICENSE_FILE for their environmental variable to point to their license server. Some operating systems may also utilize MGLS_LICENSE_FILE instead, therefore, it is important to read the user manual on the preferred environmental variable required to point to a user’s license file. Although there are different mechanisms to allow licenses to work, many companies commonly utilize the FlexLM (i.e., Flex-enabled) license server manager that runs off a node locked license.
Although most EDA tools are Linux-friendly, they tend to have issues when not installed on recommended OS flavors. Red Hat Enterprise Linux (and its free Rocky clone) and SUSE Linux products typically tend to be recommended for installing commercial-based EDA tools and are recommended for utilizing complex simulation and architecture exploration.
Siemens Questa
Siemens Questa simulates behavioral, RTL and gate-level HDL. To install Siemens Questa first go to a web browser and navigate to https://eda.sw.siemens.com/en-US/ic/questa/simulation/advanced-simulator/. Click Sign In and log in with your credentials and the product can easily be downloaded and installed. Some Windows-based installations also require gcc libraries that are typically provided as a compressed zip download through Siemens.
Synopsys Design Compiler (DC)
Many commercial synthesis and place and route tools require a common installer. These installers are provided by the EDA vendor and Synopsys has one called Synopsys Installer. To use Synopsys Installer, you will need to acquire a license through Synopsys that is typically Called Synopsys Common Licensing (SCL). Both the Synopsys Installer, license key file, and Design Compiler can all be downloaded through Synopsys Solvnet. First open a web browser, log into Synsopsy Solvnet, and download the installer and Design Compiler installation files. Then, install the Installer.
$ firefox &
- Navigate to https://solvnet.synopsys.com
- Log in with your institution’s username and password
- Click on Downloads, then scroll down to Synopsys Installer
- Select the latest version (currently 5.4). Click Download Here, agree,
- Click on SynopsysInstaller_v5.4.run
- Return to downloads and also get Design Compiler (synthesis) latest version, and any others you want.
- Click on all parts and the .spf file, then click Download Files near the top
- Move the SynopsysInstaller into
/cad/synopsys/Installer_5.4with 755 permission for cad, - move other files into
/cad/synopsys/downloadsand work as user cad from here on
$ cd /cad/synopsys/installer_5.4
$ ./SynopsysInstaller_v5.4.run
- Accept default installation directory
$ ./installer
- Enter source path as
/cad/synopsys/downloads, and installation path as/cad/synopsys - When prompted, enter your site ID
- Follow prompts
Installer can be utilized in graphical or text-based modes. It is far easier to use the text-based installation tool. To install DC, navigate to the location where your downloaded DC files are and type installer. You should be prompted with questions related to where you wish to have your files installed.
The Synopsys Installer automatically installs all downloaded product files into a single top-level target directory. You do not need to specify the installation directory for each product. For example, if you specify /import/programs/synopsys as the target directory, your installation directory structure might look like this after installation:
/import/programs/synopsys/syn/S-2021.06-SP1
Note
Although most parts of Wally, including the Questa simulator, will work on most modern Linux platforms, as of 2024, the Synopsys CAD tools for SoC design are only supported on Red Hat Enterprise Linux (or AlmaLinux/Rocky) 8.4+ or 9.1+ or SUSE Linux Enterprise Server (SLES) 15.
The Verilog simulation has been tested with Siemens Questa/ModelSim. This package is available to universities worldwide as part of the Design Verification Bundle through the Siemens Academic Partner Program members for $990/year.
If you want to implement your own version of the chip, your tool and license complexity rises significantly. Logic synthesis uses Synopsys Design Compiler. Placement and routing uses Cadence Innovus. Both Synopsys and Cadence offer their tools at a steep discount to their university program members, but the cost is still several thousand dollars per year. Most research universities with integrated circuit design programs have Siemens, Synopsys, and Cadence licenses. You also need a process design kit (PDK) for a specific integrated circuit technology and its libraries. The open-source Google Skywater 130 nm PDK is sufficient to synthesize the core but lacks memories. Google presently funds some fabrication runs for universities. IMEC and Muse Semiconductor offers full access to multiproject wafer fabrication on the TSMC 28 nm process including logic, I/O, and memory libraries; this involves three non-disclosure agreements. Fabrication costs on the order of $10,000 for a batch of 1 mm2 chips.
Startups can expect to spend more than $1 million on CAD tools to get a chip to market. Commercial CAD tools are not realistically available to individuals without a university or company connection.
Adding Cron Job for nightly builds
If you want to add a cronjob you can do the following:
- Set up the email client
muttto send emails through the command line - Enter
crontab -einto a terminal - add this code to test cloning CVW, making CVW's tests, then running
regression-wally --nightly --buildrootevery day at 21:30 in your local time
30 21 * * * curl -L https://raw.githubusercontent.com/openhwfoundation/cvw/refs/heads/main/bin/nightly_build.py | python - --path {PATH_FOR_NIGHTLY_RUNS} --target all --tests all --send_email harris@hmc.edu,rose@rosethompson.net
This utility will take up approximately 100 GB on your hard drive. You can also run the script directly from bin/nightly_build.py.
Example wsim commands
wsim runs one of multiple simulators, Questa, VCS, or Verilator using a specific configuration and one or more ELF files.
The general syntax is
wsim <config> <elf or directory>... [--options]
Every ELF named, and every *.elf found under every directory named, runs back-to-back in a single simulation session.
Tests are self-checking, so the simulation ends with a single summary: SUCCESS! All tests ran without failures. or FAIL: N test programs had errors.
Parameters and options:
-h, --help                                                   show this help message and exit
--elf ELF, -e ELF                                            ELF File name; use if name does not end in .elf
--test {buildroot,fpga,coremark,embench}, -T ...             Special testbench mode
--name NAME, -n NAME                                         Name used for log and coverage database files
--sim {questa,verilator,vcs}, -s {questa,verilator,vcs}      Simulator
--tb {testbench,testbench_fp}, -t {testbench,testbench_fp}   Testbench
--gui, -g                                                    Simulate with GUI
--ccov, -c                                                   Code Coverage
--fcov, -f                                                   Functional Coverage
--args ARGS, -a ARGS                                         Optional arguments passed to simulator via $value$plusargs
--params PARAMS, -p PARAMS                                   Optional top-level parameter overrides of the form param=value
--define DEFINE, -d DEFINE                                   Optional define macros passed to simulator
--vcd, -v                                                    Generate testbench.vcd
--lockstep, -l                                               Run ImperasDV lock, step, and compare.
--lockstepverbose, -lv                                       Run ImperasDV lock, step, and compare with tracing enabled
--rvvi, -r                                                   Simulate rvvi hardware interface and ethernet.
Run a whole directory of RISC-V Architecture Tests in one session with Questa
wsim rv64gc $WALLY/addins/riscv-arch-test/work/cvw-rv64gc/elfs/rv64i/I
Run one ELF in the Questa gui
wsim rv64gc $WALLY/addins/riscv-arch-test/work/cvw-rv64gc/elfs/rv64i/I/I-add-01.elf --gui
Run several ELFs back-to-back with Verilator
wsim rv32gc $WALLY/tests/periph/rv32/WALLY-gpio-01.elf $WALLY/tests/periph/rv32/WALLY-clint-01.elf --sim verilator
Run lockstep against ImperasDV with a single elf file in the gui. Lockstep requires a single elf.
wsim rv64gc $WALLY/addins/riscv-arch-test/work/cvw-rv64gc/elfs/rv64i/I/I-add-01.elf --lockstep --gui
Collect functional coverage over a directory of tests (add --sim vcs to use VCS).
wsim rv64gc $WALLY/addins/riscv-arch-test/work/cvw-rv64gc/elfs/priv/Sv --fcov
Run Linux boot simulation in lock step between Wally and ImperasDV
wsim buildroot buildroot --args +INSTR_LIMIT=600000000 --lockstep
Textbook Errata
See errata.md for errata on the RISC-V System-on-Chip Design textbook.