| bootrom | ||
| ci | ||
| docs | ||
| fpga | ||
| include | ||
| openpiton | ||
| scripts | ||
| src | ||
| tb | ||
| .editorconfig | ||
| .gitignore | ||
| .gitlab-ci.yml | ||
| .gitmodules | ||
| .travis.yml | ||
| ariane.core | ||
| Bender.yml | ||
| CHANGELOG.md | ||
| CODEOWNERS | ||
| CONTRIBUTING.md | ||
| Flist.ariane | ||
| LICENSE | ||
| LICENSE.SiFive | ||
| Makefile | ||
| README.md | ||
| src_files.yml | ||

Ariane RISC-V CPU
Ariane is a 6-stage, single issue, in-order CPU which implements the 64-bit RISC-V instruction set. It fully implements I, M, A and C extensions as specified in Volume I: User-Level ISA V 2.3 as well as the draft privilege extension 1.10. It implements three privilege levels M, S, U to fully support a Unix-like operating system. Furthermore it is compliant to the draft external debug spec 0.13.
It has configurable size, separate TLBs, a hardware PTW and branch-prediction (branch target buffer and branch history table). The primary design goal was on reducing critical path length.

Table of Contents
Getting Started
Go and get the RISC-V tools. Make sure that your RISCV environment variable points to your RISC-V installation (see the RISC-V tools and related projects for futher information).
Checkout the repository and initialize all submodules
$ git clone https://github.com/pulp-platform/ariane.git
$ git submodule update --init --recursive
The testbench relies on riscv-fesvr which can be found here. Follow the README there and make sure that your compiler and linker is aware of the library (e.g.: add it to your path if it is in a non-default directory).
Build the Verilator model of Ariane by using the Makefile:
$ make verilate
To build the verilator model with support for vcd files run
$ make verilate DEBUG=1
This will create a C++ model of the core including a SystemVerilog wrapper and link it against a C++ testbench (in the tb subfolder). The binary can be found in the work-ver and accepts a RISC-V ELF binary as an argument, e.g.:
$ work-ver/Variane_testharness rv64um-v-divuw
The Verilator testbench makes use of the riscv-fesvr. This means that you can use the riscv-tests repository as well as riscv-pk out-of-the-box. As a general rule of thumb the Verilator model will behave like Spike (exception for being orders of magnitudes slower).
Both, the Verilator model as well as the Questa simulation will produce trace logs. The Verilator trace is more basic but you can feed the log to spike-dasm to resolve instructions to mnemonics. Unfortunately value inspection is currently not possible for the Verilator trace file.
$ spike-dasm < trace_core_00_0.dasm > logfile.txt
Running User-Space Applications
It is possible to run user-space binaries on Ariane with riscv-pk (link).
$ mkdir build
$ cd build
$ ../configure --prefix=$RISCV --host=riscv64-unknown-elf
$ make
$ make install
Then to run a RISC-V ELF using the Verilator model do:
$ echo '
#include <stdio.h>

int main(int argc, char const *argv[]) {
    printf("Hello Ariane!\\n");
    return 0;
}' > hello.c
$ riscv64-unknown-elf-gcc hello.c -o hello.elf
$ make verilate
$ work-ver/Variane_testharness $RISCV/riscv64-unknown-elf/bin/pk hello.elf
If you want to use QuestaSim to run it you can use the following command:
$ make sim elf-bin=$RISCV/riscv64-unknown-elf/bin/pk target-options=hello.elf batch-mode=1
Be patient! RTL simulation is way slower than Spike. If you think that you ran into problems you can inspect the trace files.
FPU Support
There is preliminary support for floating point extensions F and D. At the moment floating point support will only be available in QuestaSim as the FPU is written in VHDL. This is likely to change. The floating point extensions can be enabled by setting
RVFandRVDto1'b1in theinclude/ariane_pkg.svfile.
FPGA Emulation
We currently only provide support for the Genesys 2 board. Tested on Vivado 2018.2. The FPGA SoC currently contains the following peripherals:
- DDR3 memory controller
- SPI controller to conncet to an SDCard
- Ethernet controller
- JTAG port (see debugging section below)
- Bootrom containing zero stage bootloader and device tree.

The Ethernet controller and the corresponding network connection is still work in progress and not functional at the moment.
Generating a Bistream
To generate the FPGA bitstream run:
$ source fpga/sourceme.sh
$ make fpga
This will produce a bitstream file and memory configuration file (in fpga/work-fpga) which you can permanently flash by:
- Open Vivado
- Open the hardware manager and open the target board (Genesys II -
xc7k325t) - Tools - Add Configuration Memory Device
- Select the following Spansion SPI flash
s25fl256xxxxxx0 - Add
ariane_xilinx.mcs - Press Ok. Flashing will take a couple of minutes.
- Right click on the FPGA device - Boot from Configuration Memory Device
Connect a terminal to the USB serial device opened by the FTDI chip e.g.:
$ screen /dev/ttyUSB0 115200
Default baudrate set by the bootlaoder and Linux is 115200.
Debugging
You can debug (and program) the FPGA using OpenOCD. We provide two example scripts for OpenOCD, both to be used with Olimex Debug adapter. The JTAG port ist mapped to PMOD JC on the Gensys 2 board. You will need to connect the following wires to your debug adapter:
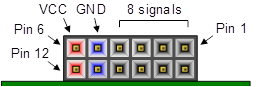
| Pin | Nr. |
|---|---|
tck |
JC1 |
tdi |
JC2 |
tdo |
JC3 |
tms |
JC4 |
trst_n |
JC7 |
$ openocd -f fpga/ariane_tiny.cfg
Open On-Chip Debugger 0.10.0+dev-00195-g933cb87 (2018-09-14-19:32)
Licensed under GNU GPL v2
For bug reports, read
    http://openocd.org/doc/doxygen/bugs.html
adapter speed: 1000 kHz
Info : auto-selecting first available session transport "jtag". To override use 'transport select <transport>'.
Info : clock speed 1000 kHz
Info : TAP riscv.cpu does not have IDCODE
Info : datacount=2 progbufsize=12
Info : Examined RISC-V core; found 1 harts
Info :  hart 0: XLEN=64, misa=0x8000000000141105
Info : Listening on port 3333 for gdb connections
Ready for Remote Connections
Info : Listening on port 6666 for tcl connections
Info : Listening on port 4444 for telnet connections
Info : accepting 'gdb' connection on tcp/3333
Then you will be able to either connect through telnet or with gdb:
$ riscv64-unknown-elf-gdb /path/to/elf
(gdb) target remote localhost:3333
(gdb) load
Loading section .text, size 0x6508 lma 0x80000000
Loading section .rodata, size 0x900 lma 0x80006508
(gdb) b putchar
(gdb) c
Continuing.

Program received signal SIGTRAP, Trace/breakpoint trap.
0x0000000080009126 in putchar (s=72) at lib/qprintf.c:69
69    uart_sendchar(s);
(gdb) si
0x000000008000912a  69    uart_sendchar(s);
(gdb) p/x $mepc
$1 = 0xfffffffffffdb5ee
You can read or write device memory by using:
(gdb) x/i 0x1000
    0x1000: lui t0,0x4
(gdb) set {int} 0x1000 = 22
(gdb) set $pc = 0x1000
If you are on an Ubuntu based system you need to add the following udev rule to /etc/udev/rules.d/olimex-arm-usb-tiny-h.rules
SUBSYSTEM=="usb", ACTION=="add", ATTRS{idProduct}=="002a", ATTRS{idVendor}=="15ba", MODE="664", GROUP="plugdev"
Preliminary Support for OpenPiton Cache System
Ariane version 4.0 has preliminary support for the OpenPiton distributed cache system from Princeton University. To this end, a different L1 cache subsystem (src/cache_subsystem/serpent_cache_subsystem.sv) has been developed that follows a write-through protocol and that has support for cache invalidations and atomics.
The corresponding integration patches will soon be released on OpenPiton GitHub repository.
To activate the different cache system, compile your code with the macro PITON_ARIANE.
Note that this feature is still in Beta stage, and may hence not be completely bug-free.
Planned Improvements
Check-out the issue tab which also loosely tracks planned improvements.
Atomics are implemented for a single core environment. They will semantically fail in a multi-core setup (unless you are using the serpent flavor of Ariane in combination with the OpenPiton cache subsystem, see previous section).
Going Beyond
The core has been developed with a full licensed version of QuestaSim. If you happen to have this simulator available yourself here is how you could run the core with it.
To specify the test to run use (e.g.: you want to run rv64ui-p-sraw inside the tmp/risc-tests/build/isa folder:
$ make sim elf-bin=path/to/rv64ui-p-sraw
If you call sim with batch-mode=1 it will run without the GUI. QuestaSim uses riscv-fesvr for communication as well.
CI Testsuites and Randomized Constrained Testing with Torture
We provide two CI configuration files for Travis CI and GitLab CI that run the RISCV assembly tests, the RISCV benchmarks and a randomized RISCV Torture test. The difference between the two is that Travis CI runs these tests only on Verilator, whereas GitLab CI runs the same tests on QuestaSim and Verilator.
If you would like to run the CI test suites locally on your machine, follow any of the two scripts ci/travis-ci-emul.sh and ci/travis-ci-emul.sh (depending on whether you have QuestaSim or not). In particular, you have to get the required packages for your system, the paths in ci/path-setup.sh to match your setup, and run the installation and build scripts prior to running any of the tests suites.
Once everything is set up and installed, you can run the tests suites as follows (using Verilator):
$ make verilate
$ make run-asm-tests-verilator
$ make run-benchmarks-verilator
In order to run randomized Torture tests, you first have to generate the randomized program prior to running the simulation:
$ ./ci/get-torture.sh
$ make torture-gen
$ make torture-rtest-verilator
This runs the randomized program on Spike and on the RTL target, and checks whether the two signatures match. The random instruction mix can be configured in the ./tmp/riscv-torture/config/default.config file.
Ariane can dump a trace-log in Questa which can be easily diffed against Spike with commit log enabled. In include/ariane_pkg.sv set:
localparam bit ENABLE_SPIKE_COMMIT_LOG = 1'b1;
This runs the randomized program on Spike and on the RTL target, and checks whether the two signatures match. The random instruction mix can be configured in the ./tmp/riscv-torture/config/default.config file.
This will dump a file called trace_core_*_*_commit.log.
This can be helpful for debugging long traces (e.g.: torture traces). To compile Spike with the commit log feature do:
$ apt-get install device-tree-compiler
$ mkdir build
$ cd build
$ ../configure --prefix=$RISCV --with-fesvr=$RISCV --enable-commitlog
$ make
$ [sudo] make install
Re-generating the Bootcode (ZSBL)
The zero stage bootloader (ZSBL) for RTL simulation lives in bootrom/ while the bootcode for the FPGA is in fpga/src/bootrom. The RTL bootcode simply jumps to the base of the DRAM where the FSBL takes over. For the FPGA the ZSBL performs additional housekeeping. Both bootloader pass the hartid as well as address to the device tree in argumen register a0 and a1 respectively.
To re-generate the bootcode you can use the existing makefile within those directories. To generate the SystemVerilog files you will need the bitstring python package installed on your system.
Contributing
Check out the contribution guide
Acknowledgements
Thanks to Gian Marti, Thomas Kramer and Thomas E. Benz for implementing the PLIC.